Custom data connectors
Prosper planEnterprise plan
Map your custom data to subscriber and subscription properties for segmentation and routing logic with custom data connector endpoints that are called when a cancel session is launched.
When a cancel flow session is started, ProsperStack will send a request to your configured data connector endpoints with a payload describing the subscriber and subscription. The endpoint can return data that ProsperStack will map to your subscriber and subscription custom properties.
Creating a data connector
Navigate to the data connectors configuration page by clicking Settings in the left navigation, then Integrations. Click Configure in the Data connectors section.
Click the Create data connector button to configure a new endpoint.
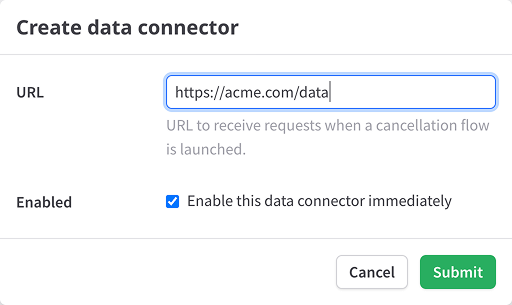
Enter the URL of your application endpoint that ProsperStack should deliver requests to when a cancel flow session is started.
Check the Enabled checkbox to immediately enable the data connector endpoint. If enabled, ProsperStack will begin delivering requests to this endpoint when the next cancel flow session is started.
Data connector payloads
The payload sent to your data connector endpoints contains data about the subscriber and subscription that is entering a cancel flow.
An example payload looks like:
{
  "data_connector_id": "dcon_Ga3w4qnkM4AvhgDUQm0rrZ7b",
  "data": {
    "subscription": {
      "id": "subn_RZXvXXN4593m8gFsjWLz3djc",
      "platform_id": "sub_1PeJ5bIjqaXshPw8qbLporJy",
      "subscriber_id": "subr_0qASIhh5cu3y7sXRKTaZ3by3",
      "mrr": "14.99",
      "status": "active",
      "properties": [],
      "created_at": "2024-07-19T15:51:41.418Z",
      "updated_at": "2024-07-19T15:51:41.418Z"
    },
    "subscriber": {
      "id": "subr_0qASIhh5cu3y7sXRKTaZ3by3",
      "platform_id": "cus_QTtOWyPkKPuuMI",
      "name": "Guybrush Threepwood",
      "email": "guybrush@example.com",
      "status": "active",
      "properties": [],
      "created_at": "2024-07-19T15:51:41.399Z",
      "updated_at": "2024-07-19T15:51:41.447Z"
    }
  }
}
The structure of the subscriber and subscription objects are identical to
the objects returned by the ProsperStack API.
See the API documentation for full details.
Expected response
Your data connector endpoint should respond with a JSON-encoded payload that contains subscriber and subscription properties.
An example response might look like:
{
  "subscriber": {
    "properties": {
      "total_deliveries": 37,
      "is_professional": true
    }
  },
  "subscription": {
    "properties": {
      "num_contacts": 5800,
      "has_premium_support": true
    }
  }
}
Response object
subscriber- Object containing details for the subscriber.properties- Object containing subscriber custom properties.
subscription- Object containing details for the subscription.properties- Object containing subscription custom properties.
The keys of each properties object should map to the unique identifier of a
ProsperStack custom property.
Learn more about formatting values for custom properties.
Verifying requests
To verify that a data connector request came from ProsperStack, ProsperStack
includes a signature in each data connector request's
ProsperStack-Signature header.
The ProsperStack-Signature header contains a timestamp and a
signature. You can extract these values to verify that the data connector
request originated from ProsperStack.
An example signature looks like:
t=1660874139,s=05ba90dc69f562b66a79dc28f40cacff6210388c804ece5094c80c4d8a89af88
Verifying the signature
1. Extract the timestamp and signature from the header
Split the header using the , character as the separator to a get a list of
elements. Then split each element using the = character as the separator to
get a prefix and value pair.
The value the the t prefix corresponds to the timestamp and the s prefix
corresponds to the signature.
2. Prepare the signature payload string
Create the signature payload string by concatenating:
- The timestamp (as a string)
- The
.(dot) character - The request body (i.e. the JSON-stringified request payload)
3. Compute the expected signature
Compute an HMAC with the SHA256 hash function using the prepared signature payload string from the previous step as the message and your ProsperStack client secret as the key.
Your client secret can be found in the Settings page of your ProsperStack dashboard under the Account section.
4. Compare the signatures
Compare the signature value from the ProsperStack-Signature header and your
computed signature from the previous step to make sure they match. To protect
against timing attacks, make sure to use a constant-time string comparison
function when comparing the signature values.
To prevent replay attacks, compare the timestamp from the
ProsperStack-Signature header and the current timestamp to make sure the
difference is within your tolerance.
Verification example
Verifying the data connector signature will look different depending on your server language, but the following is an example of what it might look like in Node.js:
import crypto from "crypto";
import { differenceInSeconds } from "date-fns";

const SECRET = "my client secret";
const TOLERANCE_SECONDS = 300;

const body = req.body;
const signatureHeader = req.headers["prosperstack-signature"];

const signatureValues = signatureHeader
  .split(",")
  .map((part) => part.split("="))
  .reduce(
    (acc, [key, value]) => ({
      ...acc,
      [key]: value,
    }),
    {}
  );
const { t: timestamp, s: signature } = signatureValues;

if (
  differenceInSeconds(new Date(), new Date(Number(timestamp) * 1000)) >
  TOLERANCE_SECONDS
) {
  throw new Error("Timestamp is out of tolerance!");
}

const computedSignature = crypto
  .createHmac("sha256", SECRET)
  .update(timestamp + "." + body)
  .digest("hex");

if (
  computedSignature.length !== signature.length ||
  !crypto.timingSafeEqual(
    Buffer.from(computedSignature),
    Buffer.from(signature)
  )
) {
  throw new Error("Signatures do not match!");
}