Offer links
Offer links allow you to present offers to your customers outside of cancellation flows and conversion campaigns.
Each offer link is a unique URL, specific to a particular subscription and offer. This enables frictionless offer acceptance without the user having to log in.
You can share offers links with your customers via email, SMS or any other channel.
Offer links are only available for offers with the "landing page" context.
Creating an offer link
Offer links can be created in a couple different ways:
You can also create offer links in HubSpot and Klaviyo with our integrations.
Sharing offer links via an automation
ProsperStack automations allow you to trigger communications to subscribers based on conditions you specify.
When you include an offer in an automated email, offer links are automatically created for each recipient.
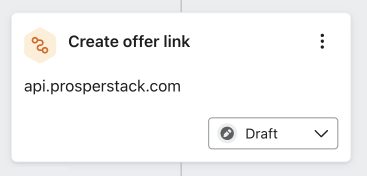
Creating an offer link via the API
If you prefer to send offer links outside of ProsperStack, you can create offer links via the API.
See the API reference for details.
Using offer links in HubSpot
To use offer links in HubSpot workflows, you'll first need to connect your HubSpot account in ProsperStack.
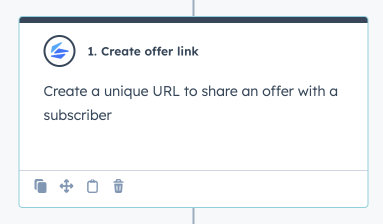
Once connected, you can use the Create offer link workflow action to automatically create offer links in HubSpot.
Adding the workflow action
To add the Create offer link workflow action, navigate to the HubSpot workflow you want to use and click the plus icon to add a new step.
This opens the Choose an action panel. Find the Integrated apps section at the bottom. Expand the ProsperStack group and click Create ofer link to start configuring the action.
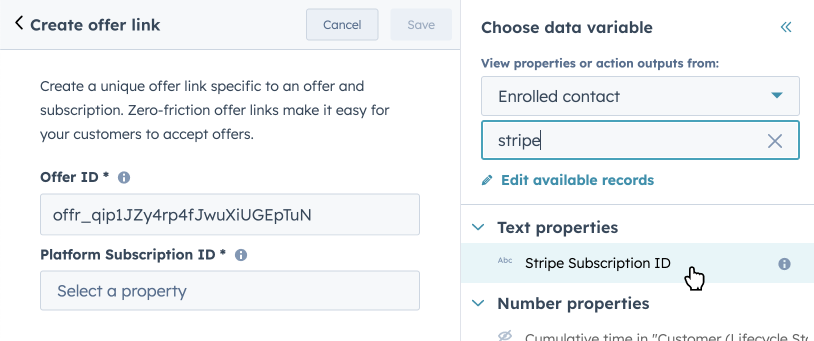
The action has two required fields:
- Offer ID — The ID of the offer, e.g.
offr_qip1JZy4rp4fJwuXiUGEpTuN. Find the offer ID on the offer details page in ProsperStack. - Platform Subscription ID — The subscription ID from your connected subscription platform, e.g. Stripe, stored in a HubSpot custom property on the contact or company record.
Click Save to save the action.
Using the generated offer link
Once you've added the workflow action, you can use the returned offer link URL in subsequent workflow steps. It's available as an action output.
For example, you can reference the offer link in an email as a custom token in
the format {{ custom.key }}, e.g. {{ custom.offerLinkUrl }}.
Under Communications, choose Send an email.
Select the email template you want to use.
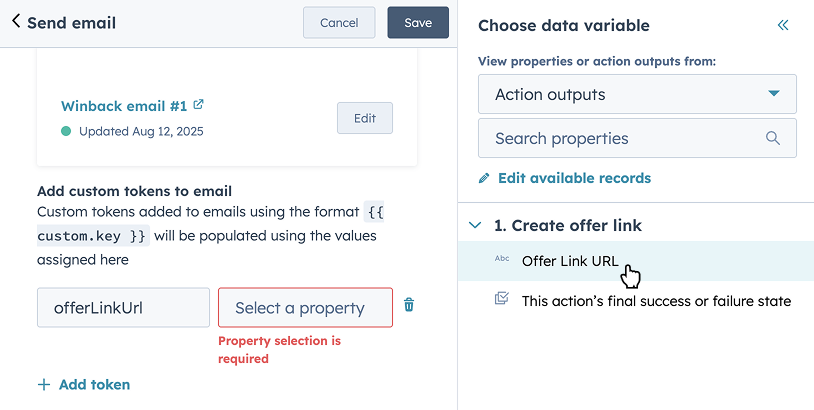
In the Add custom tokens to email section, click Add token. Enter
offerLinkUrl as the key and click into the property field.
In the Choose data variable panel, select Action outputs under Action properties and click Offer Link URL within the Create offer link action step.
You can now reference the offer link in the email body using the
{{ custom.offerLinkUrl }} token.
Confirming the offer link was created
Before using the offer link in subsequent workflow actions, it's a good idea to confirm that the offer link was created successfully.
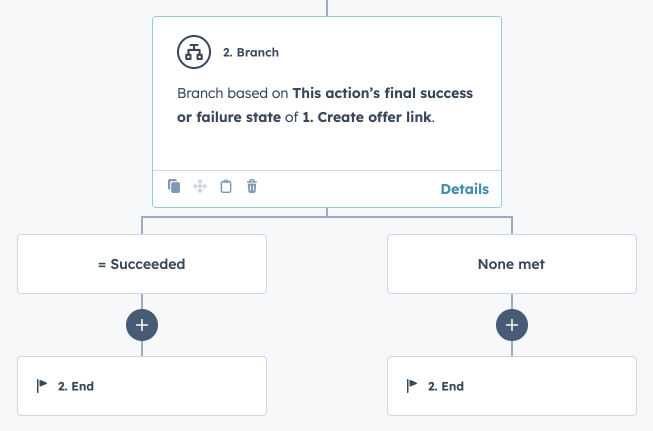
To do so, you can use a workflow branch. Click the plus icon to add a new step and choose Branch. Choose One property or action output and then click Select a property.
In the Choose data variable panel, select Action outputs under Action properties and click This action's final success or failure state within the Create offer link action step. Click Next.
In Branch 1 choose is equal to Succeeded and click Save.
Using offer links in Klaviyo
To use offer links in Klaviyo flows, you'll first need to connect your Klaviyo account in ProsperStack.
Once connected, you can use a Webhook action in your Klaviyo flows to automatically create offer links.
Adding the webhook action in Klaviyo
To begin, click Flows in Klaviyo and navigate to the flow you'd like to use.
Under Actions on the left panel, drag the Webhook action to the flow. This opens the Webhook details panel.

Enter the following Destination URL -
https://api.prosperstack.com/integrations/klaviyo/offer_links
Under Headers, add an X-Api-Key header with your API key as the value.
Find your API key in the API keys section of the Settings page in
ProsperStack.
Under JSON body, add the following:
{
  "offer_id": "...",
  "platform_subscription_id": "{{ person|lookup:'...'|default:'' }}",
  "offer_link_property": "..."
}
You will need to insert the appropriate values into the JSON body:
- offer_id — The ID of the offer, e.g.
offr_qip1JZy4rp4fJwuXiUGEpTuN. Find the offer ID on the offer details page in ProsperStack. - platform_subscription_id — The subscription ID from your connected subscription platform, e.g. Stripe, stored in a Klaviyo custom property.
- offer_link_property — The name of the Klaviyo custom property that will store the generated offer link URL.
Example:
{
  "offer_id": "offr_XLqx2w5DigghX3qs1rhxox2a",
  "platform_subscription_id": "{{ person|lookup:'Stripe Subscription ID'|default:'' }}",
  "offer_link_property": "Offer Link URL"
}
Click Save to save the action.
Using the generated offer link
Ecah time the webhook is called, ProsperStack will generate an offer link URL
and store it in the Klaviyo profile under the custom property you specified in
the offer_link_property of the JSON body.
Subsequent flow actions can therefore reference the offer link via that custom property.
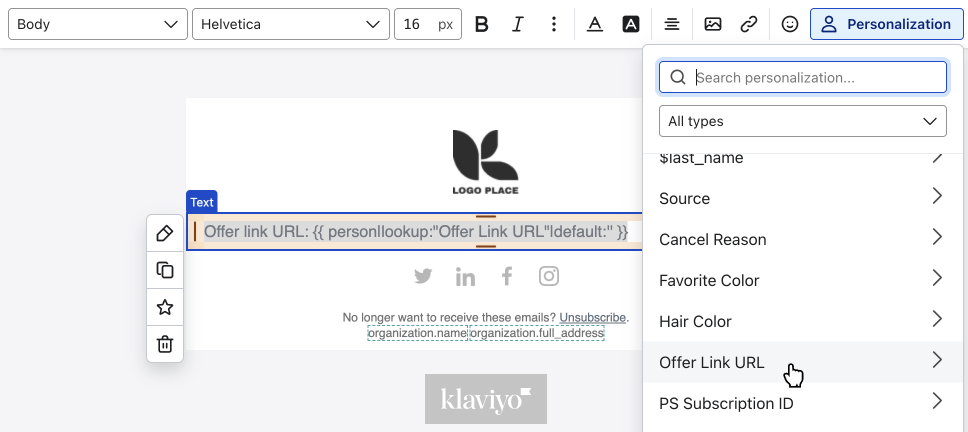
For example, custom properties can be inserted into emails via the Personalization menu. In the email editor, click into a text block, click the Personalization menu in the top right, scroll to the Custom section at the bottom of the menu and select the name of the custom property you specified.
Confirming the offer link was created
Before using the offer link in subsequent flow actions, it's a good idea to confirm that the offer link was created successfully.
To do so, you can use a conditional split. Under Actions on the left panel, drag the Conditional split action to the flow. This opens the Conditional split details panel.
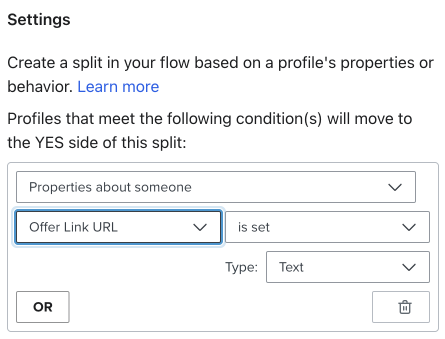
Choose Properties about someone, select the custom property you specified and choose is set.
Click Save to save the conditional split.