Chargebee
ProsperStack integrates with Chargebee to import customer and subscription data, personalize retention experiences and apply supported subscription changes. This page describes how to connect Chargebee, embed you cancellation flow and optionally sync Chargebee metadata. It also provides a reference of features and properties supported by the platform integration.
Connecting Chargebee
To connect Chargebee, you'll need your Chargebee site name, API key and publishable key.
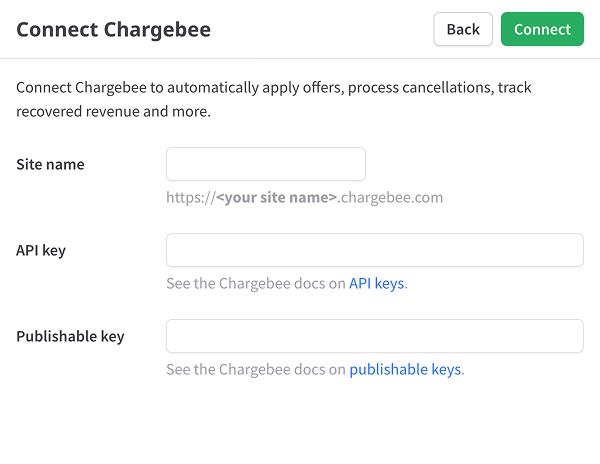
Site name — Your Chargebee site name is the first part of the URL in your
Chargebee account. For example, if your site is accessed at
https://acme.chargebee.com, your site name is acme. If you'd like to connect
your test Chargebee site instead, append -test to the site name, for example
acme-test.
API key — You can create a Chargebee API key by navigating to Settings → Configure Chargebee → API keys in your Chargebee account.
Publishable key — Create or find a publishable key in Chargebee.
For more information on Chargebee API keys, see the Chargebee documentation.
After clicking Connect, the import process will begin automatically.
Integrating Chargebee
There are two ways to direct your customers to your ProsperStack cancellation flow:
-
JavaScript embed - Embed the ProsperStack cancellation flow in your application or website for a seamless, in-app experience. This option uses the ProsperStack JavaScript library to start a flow for the customer's subscription.
-
Customer portal - Use the hosted customer portal to integrate without writing code. Customers follow a link to the portal, verify their email address and select a subscription to manage.
Syncing Chargebee metadata
Prosper planEnterprise plan
To use customer or subscription data stored in Chargebee metadata within ProsperStack, you can link metadata fields to custom properties.
Click the gear icon in the main header to open Settings, then select Integrations. Click Configure in the Chargebee section.
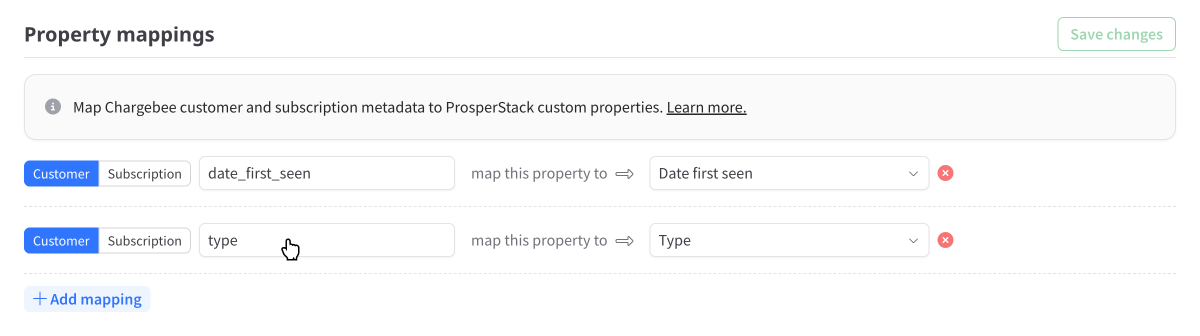
Configure new metadata mappings in the Property mappings section. Choose from either "Customer" or "Subscription" metadata, enter a Chargebee metadata field property in the text box, and choose a ProsperStack custom property (or create a new one) to link the metadata field to.
When creating a custom property in ProsperStack, make sure to choose an appropriate data type (text, number, etc.). Since Chargebee metadata values can be of any type, ProsperStack will attempt to convert the data to the type of custom property that the field is mapped to.
When you've configured your property mappings, click Save changes. ProsperStack will begin syncing your Chargebee metadata with your subscriber and subscription custom fields.
Feature support reference
Solutions
Overall support for ProsperStack solutions.
Features
Subscription platform dependent capabilities. Features supported on every platform are not listed.
Coupons
- Coupon offer
- Create new coupon
- Percentage-based coupon
- Fixed amount coupon
- One-time coupon
- Indefinite coupon
- Monthly duration coupon
- Billing cycle coupon
- Custom duration coupon
- Use existing coupon
- Apply coupon to customer
- Apply coupon to items
- Replace existing coupon
- End trial (conversion)
Plan changes
- Plan change offer
- Change billing frequency
- Disable proration on immediate changes
- Change plan at end of billing period
- Apply coupon with plan change
- Remove add-ons with plan change
- Reset billing date with plan change
Upgrade
- Upgrade offer
Downgrade
- Downgrade offer
Modify subscription
- Modify subscription offer
- Modify add-on quantity
- Modify subscription at end of billing period
- Apply coupon with subscription modification
- Disable proration on immediate modifications
Pause subscription
- Pause subscription offer
- Specify pause length
- Pause for a period of time
- Pause for a number of billing cycles
- Pause indefinitely
- Pause at end of billing period
- Reset billing date after pause
- Specify pause end date
Trial extension
- Trial extension offer
- Extend subscriptions without an active trial
- Prorate trial extensions
Product swap
- Product swap offer
Other offers
- Payment recovery offer
- Free gift offer
- One-time purchase offer
- Reactivation offer
- Reschedule order offer
Subscription cancellation
- Subscription cancellation
- Cancel at end of billing period
- Cancel unpaid invoices
Customer portal
- Customer portal
- Update billing information
- Email login
- View invoices
Properties
Properties available for customer segmentation.
Subscriber21
- Active offer ID
- Active subscription count
- ARR
- Billing location
- Cancel reason
- Cancel reason code
- Days since saved
- Email address
- First name
- Last name
- Last session date
- Last session start date
- LTV
- MRR
- Paid invoices
- Past due amount
- Saved date
- Session domain
- Session URL
- Status
- Subscription plan IDs
Subscription27
- Active coupon ID
- ARR
- Cancel reason
- Cancel reason code
- Discount fixed amount
- Discount percentage
- Duration (days)
- Is free trial
- Is past due
- Last failure reason
- Last payment date
- Last session date
- Last session start date
- LTV
- MRR
- Next billing date
- Paid invoices
- Past due amount
- Past due date
- Payment failure count
- Session domain
- Session URL
- Status
- Trial days
- Trial end date
- Trial start date
- Will renew
Plans5
- Plan IDs
- Plan interval counts
- Plan intervals
- Plan names
- Plan quantities
Add-ons2
- Add-on IDs
- Add-on names